Battery switch on travel trailer function is crucial for managing your RV’s power. Understanding how to use your battery switch correctly is key to preventing electrical problems and ensuring a smooth camping experience. This guide will walk you through the different types of switches, how to connect and disconnect your batteries safely, troubleshoot common issues, and provide essential safety tips.
We’ll cover everything from basic functionality to advanced troubleshooting, making sure you’re confident in handling your travel trailer’s power system.
Whether you’re a seasoned RVer or a first-timer, mastering your battery switch is essential for reliable power on the road. We’ll demystify the process, making it easy to understand and implement. By the end, you’ll be able to confidently manage your travel trailer’s power, preventing potential problems and ensuring enjoyable trips.
Understanding Battery Switch Functionality in Travel Trailers
Your travel trailer’s battery switch is a crucial component for managing power, ensuring you can enjoy your adventures without running out of juice. Understanding its function and operation is key to preventing electrical issues and maximizing your off-grid capabilities. This section will explain the different types, purpose, location, and proper usage of your battery switch.
Types of Battery Switches
Travel trailers typically utilize one of two main types of battery switches: a simple on/off switch or a more sophisticated multi-position switch. The simple on/off switch provides a basic connection or disconnection of the house battery from the trailer’s electrical system. The multi-position switch, often a rotary type, offers more control, allowing you to select different combinations of battery power sources (e.g., house battery only, chassis battery only, both batteries combined, or all batteries disconnected).
Some higher-end models even include switches with additional positions for connecting a generator or shore power.
Purpose of the Battery Switch: Managing Power Sources
The battery switch serves as the central control point for your travel trailer’s battery systems. It allows you to manage the power flow from the house battery (which powers the interior lights, appliances, and other 12V systems) and the chassis battery (which powers the starting system for your tow vehicle if the trailer is wired to share it). This control is essential for preventing accidental discharge of one battery by another, conserving battery life, and isolating circuits for maintenance or repairs.
For example, you might disconnect the house battery while storing your trailer to prevent a slow drain, or you might isolate a specific circuit if you suspect a fault.
Location and Accessibility of the Battery Switch
The battery switch’s location varies depending on the trailer’s make and model. It’s commonly found near the batteries themselves, often in a compartment accessible from the outside of the trailer, perhaps near the tongue or in a side storage bay. Some manufacturers might place it inside a dedicated electrical panel within the trailer. Regardless of its location, the switch should be clearly labeled and easily accessible for safe and convenient operation.
Ideally, it should be positioned where it is protected from the elements but still readily reachable.
Step-by-Step Guide to Using a Battery Switch
Before operating the switch, always consult your owner’s manual for specific instructions related to your trailer’s model. However, these general steps apply to most battery switches:
- Locate the switch: Find the battery switch using the information provided in your owner’s manual or by visually inspecting the areas mentioned above.
- Identify the switch positions: Understand the meaning of each position on the switch (e.g., “Off,” “House,” “Chassis,” “Both,” “Generator”). This information is usually clearly marked on the switch itself.
- Select the desired position: Carefully rotate or switch the switch to the position that meets your needs. For instance, switch to “Off” to completely disconnect the batteries when storing the trailer. Switch to “House” to power only the house systems while leaving the chassis battery for starting.
- Verify functionality: After changing the switch position, check the functionality of your systems (lights, appliances, etc.) to ensure the switch is working correctly.
Connecting and Disconnecting Power Sources
Understanding how to properly connect and disconnect your travel trailer’s power sources is crucial for both safety and the longevity of your batteries. This section will walk you through the process, highlighting important safety precautions and potential problems to avoid.
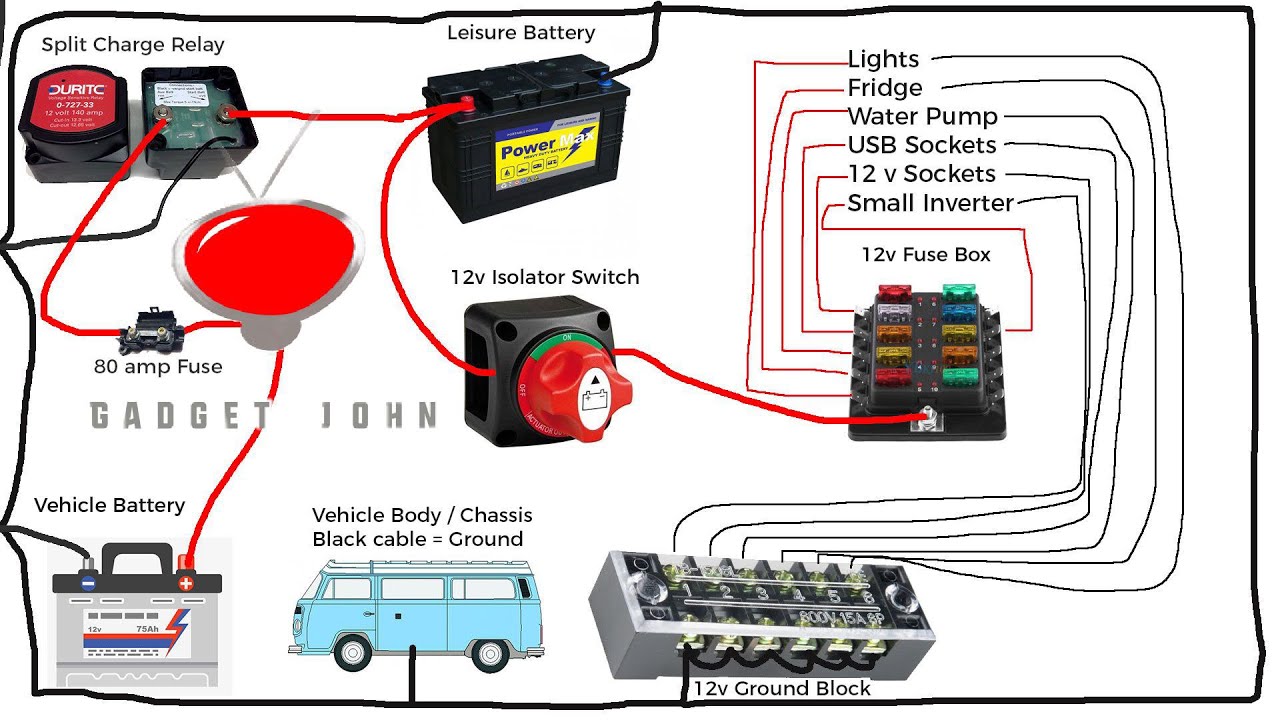
A typical travel trailer battery system involves two main batteries: the chassis battery (used for starting the tow vehicle’s engine when connected) and the house battery (powering the trailer’s interior systems). These are usually connected via a battery switch, allowing you to isolate either or both batteries as needed.
Travel Trailer Battery System Wiring Diagram
The following diagram illustrates a common setup. Remember, specific wiring may vary depending on your trailer’s model and year. Always consult your owner’s manual for the most accurate representation of your system.
| Component | Description |
|---|---|
| Chassis Battery | Provides power for starting the tow vehicle’s engine. Usually a deep-cycle or starting battery. |
| Battery Switch | A multi-position switch that controls the connection between the chassis battery, house battery, and the trailer’s electrical system. Common positions include: “Off,” “Both,” “Chassis,” and “House.” |
| House Battery | Powers the interior lights, appliances, and other 12V systems in the travel trailer. Typically a deep-cycle battery designed for sustained discharge. |
| Converter/Charger | Converts 120V AC power from a campsite hookup to 12V DC power for the house battery, and also charges the house battery. |
| Trailer Wiring Harness | Connects the trailer’s electrical system to the tow vehicle. |
Safely Connecting and Disconnecting Batteries
Always follow these steps to ensure safe operation:
- Turn off all appliances and electronics within the trailer before disconnecting any batteries.
- Locate the battery switch. It’s usually clearly labeled and easily accessible.
- Carefully move the switch to the “Off” position to completely disconnect both batteries from the trailer’s electrical system.
- If disconnecting the house battery from the chassis battery (for example, to prevent parasitic drain), ensure the switch is in the “Off” position before doing so.
- When reconnecting, reverse the process, ensuring the switch is in the desired position (“Both,” “Chassis,” or “House”) before turning on any appliances.
Disconnecting Batteries During Extended Storage, Battery switch on travel trailer function
Disconnecting the house battery when storing your travel trailer for extended periods is vital to prevent the battery from completely discharging due to parasitic drain from low-level power draws (clocks, alarms, etc.). A fully discharged battery can be damaged, requiring replacement. This also helps to avoid corrosion of the battery terminals.
Potential Issues from Incorrect Battery Switch Use
Incorrect use of the battery switch can lead to several problems:
- Dead Batteries: Leaving the switch in a position that allows continuous drain from one or both batteries will lead to them becoming completely discharged.
- Damaged Electronics: Incorrect switching can lead to voltage spikes that can damage sensitive electronic components in the trailer.
- Electrical Fires: Loose connections or improper switching can create sparks and heat, potentially leading to a fire.
- System Malfunction: Incorrect switching can cause unexpected system shutdowns or malfunctions.
Troubleshooting Common Battery Switch Problems

Your travel trailer’s battery switch is a crucial component, responsible for managing power flow between your trailer batteries and external power sources. Problems with this switch can leave you stranded without power, so understanding common issues and how to fix them is essential. This section will guide you through troubleshooting and preventative maintenance for a smooth and power-filled RV experience.
Common Battery Switch Problems and Solutions
Identifying the root cause of a malfunctioning battery switch is the first step to resolving the problem. Common issues stem from corrosion, loose connections, or a faulty switch itself. Addressing these issues promptly prevents more significant problems down the line.
- Corrosion: Corrosion builds up on the terminals and switch contacts over time, hindering electrical conductivity. This manifests as weak or intermittent power.
- Solution: Clean the terminals and switch contacts thoroughly using a wire brush and a battery terminal cleaner. Apply a corrosion inhibitor to prevent future buildup. Remember to disconnect the battery’s negative terminal before cleaning to prevent accidental short circuits.
- Loose Connections: Loose connections at the battery terminals or the switch itself create intermittent power or complete power loss. This is often noticeable by a flickering of lights or appliances.
- Solution: Tighten all connections using a wrench, ensuring a secure fit. If the connections are severely corroded, replacement may be necessary. Always ensure the connections are tight enough to prevent movement but not so tight as to strip the terminals.
- Faulty Switch: A faulty switch might fail to make or break the circuit correctly, resulting in inconsistent power or no power at all. This often requires replacement of the switch.
- Solution: Test the switch using a multimeter to check continuity. If the switch is faulty, it needs to be replaced. Refer to your trailer’s manual for instructions on replacing the switch.
Preventative Maintenance Schedule
Regular maintenance significantly reduces the likelihood of battery switch problems. A simple schedule can prevent costly repairs and downtime.
So, you’re prepping for a road trip? Awesome! First things first: make sure you understand your travel trailer’s power system. Check out this guide on the battery switch on travel trailer function to avoid any dead-battery surprises. Once you’ve got that sorted, it’s time to think about entertainment. A killer audiophile travel setup can really elevate the experience, turning your journey into a mobile concert hall.
Don’t forget to pack your favorite tunes!
- Monthly Inspection: Visually inspect the battery switch and terminals for corrosion, loose connections, or any signs of damage. Tighten any loose connections and clean any corrosion.
- Annual Deep Clean: Perform a thorough cleaning of the battery terminals and switch contacts using a wire brush and battery terminal cleaner. Apply a corrosion inhibitor. This more extensive cleaning addresses any potential issues before they become major problems.
- Every Two Years: Consider replacing the battery switch as a preventative measure. This ensures optimal performance and longevity, particularly in harsh environments. A switch that is starting to show signs of wear should be replaced even sooner.
Replacing a Faulty Battery Switch
Replacing a faulty battery switch requires careful attention to safety and proper procedures. Always disconnect the negative battery terminal before starting any work.
- Gather Necessary Tools: You’ll need a wrench, screwdriver (likely Phillips head), wire cutters (possibly), and a new battery switch of the correct amperage and type. Refer to your trailer’s manual or the old switch for specifications.
- Disconnect the Battery: Disconnect the negative (-) terminal of your trailer battery first, then the positive (+) terminal. This prevents accidental short circuits and protects you from electrical shock.
- Remove the Old Switch: Carefully remove the old switch, noting the wiring configuration before disconnecting any wires. Take pictures if it helps you remember the connections.
- Install the New Switch: Connect the wires to the new switch, matching the configuration of the old switch. Ensure all connections are secure and properly tightened.
- Reconnect the Battery: Reconnect the positive (+) terminal first, then the negative (-) terminal. Test the switch to verify it’s functioning correctly.
Battery Switch Types and Their Applications
Choosing the right battery switch for your travel trailer is crucial for managing power effectively and preventing electrical problems. Different types of switches offer varying levels of control and protection, making the selection process dependent on your specific needs and setup. This section will explore the common types, their applications, and help you determine the best fit for your travel trailer.
So, you’re hitting the road in your travel trailer? Awesome! First things first: learn how to properly use your battery switch. Check out this guide on the battery switch on travel trailer function to avoid any dead battery surprises. Once you’ve got that sorted, it’s time to think about entertainment. If you’re an audiophile, you’ll want to check out this resource on creating an amazing audiophile travel setup to enjoy your favorite tunes on the road.
Get those details nailed down and your trip will be smooth sailing!
Single Pole Battery Switches
A single-pole battery switch controls only one battery. It’s the simplest type and is suitable for travel trailers with a single house battery. This switch typically connects or disconnects the battery from the trailer’s electrical system. It’s a straightforward solution for basic power management.
Double Pole Battery Switches
Double-pole switches control two separate circuits. This is useful for isolating both the house battery and the chassis battery (used for starting the tow vehicle) from the trailer’s electrical system. This type offers more comprehensive protection and control than a single-pole switch, especially for trailers with separate batteries for house and starting functions. The added safety feature prevents accidental cross-connection or draining of one battery by the other.
Dual Battery Switches
Dual battery switches are designed to manage two batteries, typically a house battery and a starting battery. Unlike double-pole switches, dual battery switches often include features like a combination switch for connecting both batteries to charge simultaneously or selectively choosing which battery powers the trailer’s systems. They often offer more advanced functionality, such as prioritizing one battery over the other.
Some even incorporate metering capabilities to monitor battery voltage.
Choosing the Right Battery Switch
The best battery switch for your travel trailer depends on your setup. A single house battery system only requires a single-pole switch. If you have a separate starting battery and a house battery, a dual battery switch provides better control and safety. A double-pole switch might be suitable if you need independent control of two circuits, but this is less common in typical travel trailer configurations.
Consider the number of batteries, the need for separate circuit control, and any desired monitoring features when making your selection.
Examples of Wiring Configurations
| Switch Type | Wiring Diagram (Text Description) | Advantages | Disadvantages |
|---|---|---|---|
| Single Pole | The switch connects the positive terminal of the house battery to the positive bus bar of the trailer’s electrical system. The negative terminal of the battery is connected directly to the negative bus bar. | Simple, inexpensive, easy to install. | Limited control; only manages one battery. |
| Double Pole | Two separate switches control the positive and negative leads of either the house battery or the chassis battery, independently isolating each from the trailer’s system. | Complete isolation of each battery from the trailer’s electrical system. Enhanced safety. | More complex installation; requires more wiring. |
| Dual Battery | One switch controls the connection of both batteries to the charging system. Another switch selects whether the house battery or the starting battery powers the trailer’s 12V system, or both in combination. | Advanced control; allows for combined charging and selective power sourcing. Often includes battery voltage monitoring. | More expensive than single or double-pole switches; more complex installation. |
Safety Precautions When Working with Batteries and Switches: Battery Switch On Travel Trailer Function
Working with 12-volt batteries and the electrical systems in your travel trailer might seem straightforward, but neglecting safety can lead to serious consequences. Understanding and adhering to safety precautions is crucial to prevent injury and damage to your equipment. This section details essential safety measures to ensure a safe and successful experience.
Incorrect use of a battery switch can result in electrical shocks, short circuits, battery explosions, or even fires. These hazards are not to be taken lightly. Always treat the electrical system with respect and follow the guidelines below.
Personal Protective Equipment (PPE) for Battery Work
Working with batteries and electrical systems requires appropriate personal protective equipment (PPE) to mitigate risks. This includes safety glasses to protect your eyes from sparks or battery acid splashes, rubber gloves to insulate your hands from electrical shocks, and closed-toe shoes to protect your feet from dropped objects or accidental spills. Consider using a face shield for added protection, especially when working with potentially corrosive battery acid.
Appropriate clothing that covers exposed skin is also recommended.
Safety Guidelines for Handling and Maintaining Travel Trailer Batteries and Electrical Systems
Following these guidelines will significantly reduce the risk of accidents and ensure the longevity of your travel trailer’s electrical system.
- Always disconnect the negative (-) battery terminal first when working on the electrical system. This prevents accidental short circuits.
- Ensure good ventilation when working with batteries, as they release hydrogen gas, which is highly flammable and explosive. Avoid sparks or flames near the batteries.
- Inspect battery terminals and connections regularly for corrosion. Clean them with a wire brush and baking soda solution if necessary.
- Never mix different types of batteries (e.g., lead-acid and lithium-ion) in the same system. This can lead to voltage mismatches and damage to your equipment.
- Use only appropriately rated tools and equipment when working with the electrical system. Never use tools with damaged insulation.
- Before making any connections or adjustments to the battery switch or electrical system, always turn off all power sources.
- If you are unsure about any aspect of working with your travel trailer’s electrical system, consult a qualified electrician or RV technician.
- Keep batteries upright to prevent spills and leaks. Store them in a cool, dry, and well-ventilated area.
- Check battery fluid levels (if applicable) regularly and add distilled water as needed. Never overfill.
- Properly dispose of old or damaged batteries according to local regulations. Never throw them in the trash.
Mastering your travel trailer’s battery switch is a fundamental skill for any RVer. By understanding its function, practicing safe operation, and performing regular maintenance, you’ll ensure reliable power and prevent costly repairs. Remember, safety is paramount when working with electrical systems, so always prioritize caution and follow the guidelines Artikeld in this guide. Happy travels!
Frequently Asked Questions
What happens if I leave my battery switch on while storing my travel trailer?
Leaving your battery switch on during extended storage can drain your batteries, potentially damaging them. Always turn it off.
Can I use a battery switch from a different type of vehicle in my travel trailer?
It’s generally not recommended. Travel trailer battery systems have specific voltage and amperage requirements. Using an incompatible switch could damage your electrical system.
How often should I inspect my battery switch for corrosion?
Inspect your battery switch and connections at least twice a year, or more frequently if you live in a humid climate.
What type of PPE should I use when working with my travel trailer’s battery system?
Always wear safety glasses, gloves, and closed-toe shoes when working with batteries.
